Japanese Taro Bun
This taro bun is absolutely delicious! It tastes even better than store-bought ones! The soft, fragrant bread paired with rich, smooth taro filling melts in your mouth with every bite. Plus, making it at home is such a money-saver!

 1 Comments
What does a taro bun taste like?
The taro bun has a sweet, delicate flavor, with a soft, fluffy, and slightly elastic exterior. The filling is made from carefully prepared taro, offering a smooth and mildly sweet taste. The overall flavor is fresh and natural, not overly sweet, making it a delightful treat for the taste buds. It’s a tasty and definitely worth-trying Japanese snack.
Ingredients Needed
Dough:
Bread Flour: The main ingredient for the dough. It has a high protein content, which forms a strong gluten network, giving the bread great stretch and elasticity.
Sugar: Adds sweetness to the dough and enhances flavor, while also providing nourishment for the yeast, helping it grow and ferment the dough properly.
Yeast: The key to fermentation. It converts the sugar in the dough into carbon dioxide and alcohol, causing the dough to rise and become soft.
Milk: Adds moisture to the dough, helping the flour absorb water and form the dough structure. It also adds a rich dairy flavor that enhances the overall taste. Using cold milk helps control the dough temperature and prevents premature fermentation, allowing better gluten development.
Butter: Adds fragrance and richness to the dough, making it softer and more elastic, while also helping the dough maintain shape during fermentation and baking.
Taro Filling:
Taro: Needs to be steamed beforehand. The main ingredient in the filling, with a smooth texture and sweet flavor, it gives the filling its rich taste and fragrant aroma.
Sweetened Condensed Milk: Adds sweetness and a creamy flavor to the taro filling, making it richer and more flavorful.
Milk: Used to adjust the consistency of the taro filling, making it smoother and easier to spread and fill.
Milk Powder: Enhances the milky flavor, adding depth and richness to the taro filling.
Purple Yam Powder: Adds a unique color to the filling, giving it a tempting purple hue, while also enhancing its texture and taste.
What can you substitute for taro?
Taro can usually be found at Asian supermarkets. If you can’t find taro, you can certainly substitute it with yellow or orange sweet potatoes.
Essential Tools
1.Blender: To blend the steamed taro along with condensed milk, milk, milk powder, purple yam powder, and other ingredients, creating a smooth taro filling.
2.Kneading Tools (Cutting Board, Rolling Pin, etc.): Used during the dough-making process to knead the dough until it reaches the right consistency. After letting the dough rest, roll it out into a circle to make it easier to wrap the filling.
3.Baking Sheet: For placing the filled taro buns during the proofing and baking process in the oven.
4.Oven: Provides the necessary heat to bake the taro buns, allowing them to proof and bake to perfection.
5.Spray Bottle: Used to lightly spray water on the surface of the dough after proofing, which helps sesame seeds stick to the top.
6.Parchment Paper: Placed on the dough while baking to prevent the surface from burning. It also helps with heat insulation and ensures the bread bakes evenly with a beautiful golden color.
INGREDIENTS
MAIN INGREDIENTS
- 200g Bread Flour
- 200g taro
- 215g Milk
- 15g Sugar
- 2g Yeast
- 20g Butter
- 20g Sweetened Condensed Milk
- 20g Milk Powder
- 8g Purple Yam Powder
DIRECTIONS
STEP 1
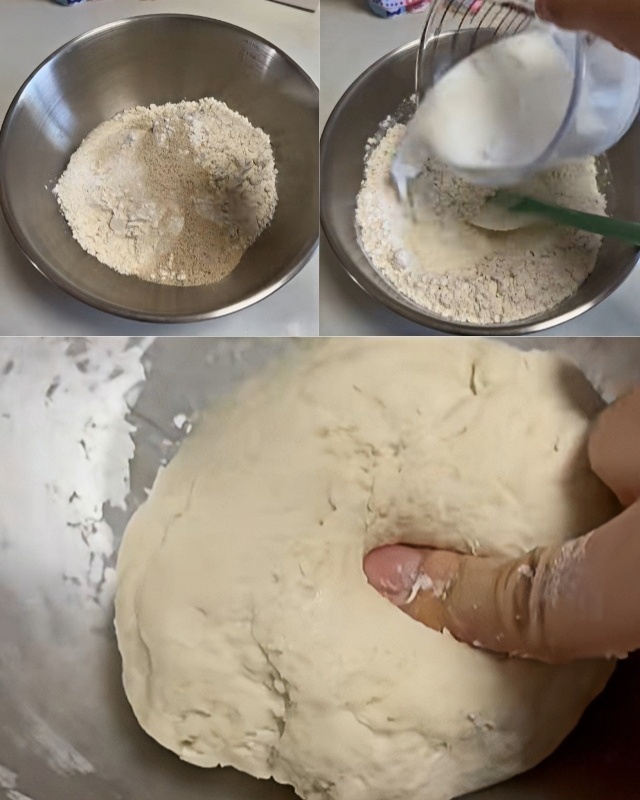
In a bowl, add 200g bread flour, 15g sugar, and 2g yeast.
Stir to combine, then add 135g cold milk.
Continue mixing and knead by hand until it forms a dough.

STEP 2
Cover and refrigerate the dough for 1 hour.
The chilled dough will form a rough membrane.

STEP 3
Add 20g softened butter to the dough and knead until fully incorporated.
Let it rise at room temperature until it doubles in size.

STEP 4
Make the Taro Filling:
Steam 200g of taro, then place it into a blender.
Add 20g sweetened condensed milk, 80g milk, 20g milk powder, and 8g purple yam powder. Blend until smooth and fully mixed.

STEP 5
Once the dough has fermented, punch it down to release air, then divide it into 6 portions.
Take one portion and continue gathering it inwards until it forms a smooth ball.
Let it rest for 15 minutes.

STEP 6
Roll one dough ball into a circle.
Flatten the edges and flip it over so the smooth side is facing down.
Place a generous amount of taro filling in the center.
Fold and pinch the edges tightly to seal.

STEP 7
Place the buns onto a baking tray.
Let them proof in the oven at 30°C (86°F) for 20 minutes.
After proofing, lightly spray the buns with water and sprinkle with sesame seeds.
Cover with parchment paper.

STEP 8
Place the buns in the oven, then place a baking tray on top.
Bake with both top and bottom heat at 170°C (340°F) for 15 minutes.

STEP 9
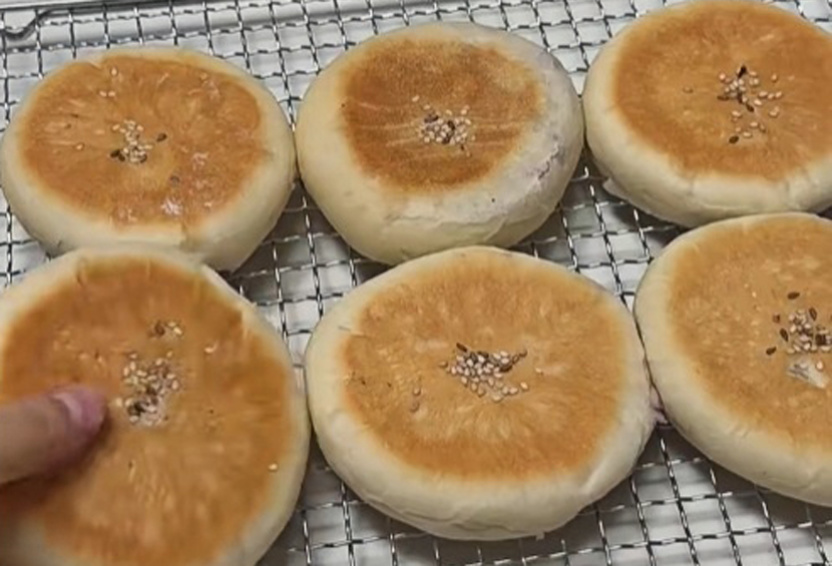
Done! The buns should have a beautiful, even golden color.

More Recipes to Try
Oatmeal Sandwich Cookies: Sweet & Chewy Treats
Crispy and Fluffy Air Fryer Crescent Rolls
Easy and Simple Air Fryer Peanut Butter Oat Cookies
How to Store?
Taro buns are best eaten fresh within a day or two. You can also store them in an airtight container in the fridge for up to 1 week. To reheat, microwave for 20-30 seconds.
For long-term storage, taro buns can be frozen for up to 3 months.
Recipe Variations
Pork Floss Taro Filling:
Mix pork floss with taro filling in a 1:3 ratio. When wrapping the buns, add an appropriate amount of pork floss taro filling and pinch the edges tightly. The savory, chewy pork floss complements the sweet, smooth taro, creating a delightful balance of flavors.
Mango Taro Filling:
Cut fresh mango into small pieces and mix with taro in a 1:2 ratio. The fresh, sweet mango flavor adds a refreshing taste to the taro filling, offering both the smoothness of taro and the juiciness of mango in every bite.
Strawberry Taro Filling:
Mash fresh strawberries and mix them into the taro filling. The strawberry-to-taro ratio should be around 1:3. The tangy sweetness of the strawberries helps balance the richness of the taro, making the filling taste fresher and lighter.
Chocolate Chip Taro Filling:
Add an appropriate amount of chocolate chips into the taro filling. When baked, the chocolate chips will slightly melt, creating a rich, sweet combination with the taro. Each bite delivers a pleasant surprise from the chocolate.
Cream Cheese Taro Filling:
Soften cream cheese and mix it with taro in a 1:3 ratio. The rich, creamy texture of the cream cheese enhances the taro filling, giving it a smooth, indulgent flavor.


1 REVIEWS